
The Placement
of the Aqwertian Folder
1.
If
you are working with
a CD please load it now and find the folder labeled “Aqwertian”.
If you are working with an emailed zip
file, unzip it and find the “Aqwertian” folder.
2.
Copy
the unopened Aqwertian folder to Local Disk (C). The Local Disk (C) can be found
under “My
Computer”. It should be copied the root
of your C drive. That is, it should not
be
indentured under/within another file.
See the Illustration #1 below.
When this is
folder
successfully placed it will reside as one of the folders listed under the C
drive.
Since folders are stored in
alphabetical order…most likely the Aqwertian folder will
be near or
at the top of the list.
a. Illustration #1 depicts
the following:
i.
“My
Computer” with the “Local Disk (C)”
ii.
The
Aqwertian Folder in place in the “Local
Disk (C)”
iii.
The
Aqwertian Folder opened showing its content files
The
Proper Placement of the Aqwertian Folder

The Proper Placement of the Aqwertian DLLs
1.
There
are three DLL’s necessary that must be in your C:/Windows/System
Directory.
These can be found
within the DLL Folder
within the Aqwertian Folder. They
are named as follows:
a. MxMidi16.dll
b. MxMidi32.dll
c. MxMidi98.dll
2.
These
DLLs should be moved to the C:/Windows/System Directory located as shown in
the following Illustrations (not the one labeled
Systems32):
a. Illustration #2
shows: The “Windows” Folder/Directory
within the Local Disk (C) and
at the same
level as the new “Aqwertian” Folder/Directory.
b. Illustration #3 shows:
1.
The
DLL Folder within the Aqwertian Directory
2.
The
DLL Folder open with the DLLs ready to move
3.
The
DLLs moved into the Window/System Directory
The Proper Placement of the
Aqwertian DLLs
The
Proper Placement of the Aqwertian DLLs

Establishing
a Shortcut for the Start Menu
1.
A shortcut can be established to allow you to quickly start
MUSIC AT YOUR FINGERTIPS! From the START menu.
2.
The Illustrations that follow show how this is accomplished:
a.
Illustration #4: Shows how to create the Shortcut
b.
Illustration #5: Shows how to move it to the Start menu
c.
Illustration #6: Shows the new Start Menu
Establishing
a Shortcut for the Start Menu

Establishing a
Shortcut for the Start Menu
Establishing
a Shortcut for the Start Menu
Click on the Aqwertian Shortcut and enter the grand world of the
Performing Arts. Now with MUSIC AT
YOUR FINGERTIPS! You can Play
to your Hearts Content.
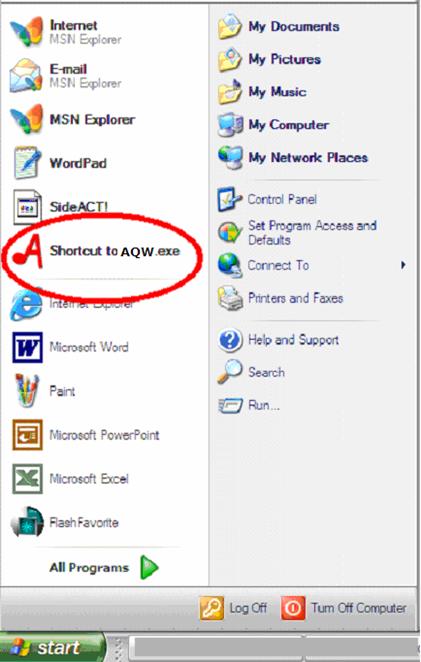
Illustration #7:
The Aqwertian Name
Illustration #8:
Splash Screen
Illustration #9:
Aqwertian Music Intellectual
Property
Illustration
#10:
Getting Started
Illustration #11:
Open an Existing Arrangement
from ‘All
Arrangements’
Illustration
#12:
Playing or Editing
an Existing Arrangement
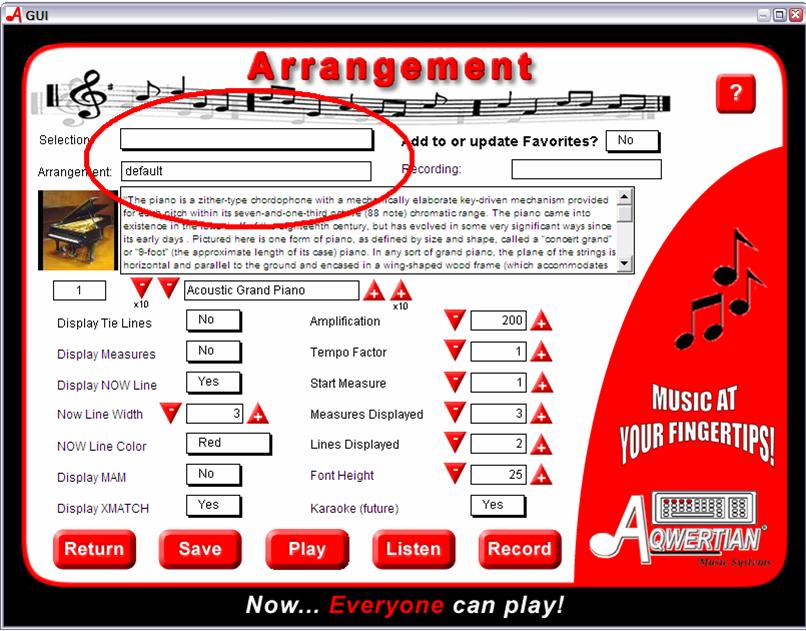
Notice that our Arrangement (.aqw) pick “Joy To The World” is loaded as well as the underlying .MUS/Music (2Joytowor.mid_b.mus)
shown here now as the Selection. The Selection field and underlying file cannot be changed but the Arrangement can be…based on your choices as expressed by the
settings on this page.
If you are happy with “Joy To The
World” as you have it currently arranged…you may proceed immediately
to Play, Listen, or Record. If you
wish to change any setting, such as the Instrument, you may do so
temporarily or permanently. For a
temporary change…just change the setting and proceed to Play, Listen, or Record.
If you wish the change to be
permanent you may either “Save” the
change without changing the Arrangement
name…in this
case “Joy To the World” or you
can modify all or part of the Arrangement to
something meaningful…i.e., “Joy To The World Harp” if this Arrangement uses a
Harp.
It is important to remember at
this point that you need to name an Arrangement for a Selection…if you
plan to Save it for
future Play since a Selection may have
many Arrangements.
Now let’s take a look at each of the Arrangement
preferences that can set.
|
Notice that our Arrangement (.aqw) pick “Joy To The World” is loaded as well as the underlying .MUS/Music (2Joytowor.mid_b.mus)
shown here now as the Selection. The Selection field and underlying file cannot be changed but the Arrangement can be…based on your choices as expressed by the
settings on this page. If you are happy with “Joy To The
World” as you have it currently arranged…you may proceed immediately
to Play, Listen, or Record. If you
wish to change any setting, such as the Instrument, you may do so
temporarily or permanently. For a
temporary change…just change the setting and proceed to Play, Listen, or Record. If you wish the change to be
permanent you may either “Save” the
change without changing the Arrangement name…in this
case “Joy To the World” or you
can modify all or part of the Arrangement to
something meaningful…i.e., “Joy To The World Harp” if this Arrangement uses a
Harp. It is important to remember at
this point that you need to name an Arrangement for a Selection…if you
plan to Save it for
future Play since a Selection may have
many Arrangements.
Now let’s take a look at each of the Arrangement
preferences that can set. |
Favorite
Arrangements:
Favorites are a subset of “All
Arrangements”. Their purpose
is to allow a
fast access via a shorter List.
Favorites are edited the same as other Arrangements.
Jukebox:
The Jukebox feature is not
operational at this time. It will allow continuous
Listening to Favorite Arrangements.
Recordings:
To
play a recording found on this list browse to the ‘C:\Aqwertian\recordings’
folder and either double click the recorded midi file or go first to
your favorite
music player (ex:
Windows Media Player) and open it by browsing to the file
using that application. In
the future you will be able toListen to Recordings by
clicking directly on
this list.
Illustration
#13:
The Arrangement of a New Selection (1)
Illustration #14:
The
Arrangement of a New
Selection (2)

Choosing New Selection on the Selection Screen automatically loads
an Arrangement named default which automatically sets the User
Preferences to a previously defined state. See Illustration #18-#21
for descriptions of these preferences. The next step is choosing the
New Selection. Place your
cursor arrow on the heavy black line at the
bottom of the Selection box (see
yellow arrow above) to open the list.
The
Arrangement of a New Selection
(3)
Click on your choice to
open it.
The
Arrangement of a New Selection (4)
Your choice is now loaded. Play can begin immediately by
clicking the Play
button. The
user preferences
are automatically applied or provide a baseline for the new Arrangement
as shown in the
following example. Changes to any of the
preferences can be made before
clicking
play and playing for as long as desired can commence. However if you wish to save
this
Arrangement for future play then it needs to be named.
The Arrangement of a New Selection (5)
In this example
the Instrument choice
has been changed to Accordion and
the default
Arrangement has been renamed
to allow it to retain the new
preference choice when
saved.
The Arrangement of a New
Selection (6)
The Arrangement can also
be added to Favorites
and when given a Recording name…recorded.
Don’t forget to click on Save
before leaving this screen if you want your choices retained for
for future
performances.
User Preferences
User Preferences Descriptions
(1)
|
Name of Preference |
User Response |
Description of
Preference |
||
|
Selection |
Pick
From Drop Down Box |
This is a list of all of the Music Files that
are available for play. These are the
basic .MUS files which in Aqwertian Music equivalent of a sheet of music in
that the notes and their sequence cannot be altered. However,
as they are played they can be
skipped, played longer/shorter and
sustained, etc. |
||
|
Arrangement |
Enter the Name of the Arrangement |
This block is where you enter the name
of an Arrangement you wish to Save for future
play. This saves the preference
choices on this page under the name you choose. Check this block before
you click on Save to insure it
reflects a title that will be meaningful. |
||
|
Add/Update Favorites |
Enter Yes/No |
The default is No. Selecting Yes in
conjunction with Save places this
Arrangement both on the All and Favorites list found on the Selection
page. |
||
|
|
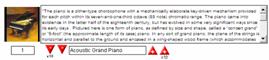
Choose from 128 |
Aqwertian allows you to play a selection
using any of 128
Instruments and other sound choices. All of these choices their associated
numbers, and a description can be viewed by clicking on ? (HELP..upper right). The box at
the left of this choice reflects the number assigned to a particular
instrument. Its name is reflected in
the center box. A choice is made by
using the red arrows to move to the number of the instrument desired. Depending on the Red Arrow chosen….movement up or
down through the list will be in increments of 1 or 10. |
User Preferences Descriptions (2)
|
Name of Preference |
User
Response |
Description of
Preference |
|
Display Tie-Lines |
Enter Yes/No |
Not a supported
choice for most songs at this time. The usefulness of this feature is being reconsidered. |
|
Display Measures |
Enter Yes/No |
Displays
the measure number. This is helpful in identifying an area needing extra
practice. Using Start Measure (#) see below to begin a performance can then be ended at
any time by clicking on Stop or clicking the Close X at the top or hitting Escape. The display may be less confusing without the Measure Numbers. |
|
Display NOW Line |
Enter Yes/No |
The
NOW Line is the cursor that indicates where the performer is in the performance and thus the next
note(s) that should be played |
|
NOW Line Width |
Use Arrows to
Adjust from 1 to ? |
This
adjusts the width of the NOW line.
Personal preference rules. Too
wide will cover up notes. Too thin is
hard to see. |
|
NOW line Color |
Pick from Drop
Down Box |
Place
Arrow on Black line at the bottom of the box and click right mouse button to
open. Highlight and click on preferred color choice: Green, Red, Orange, Yellow, Blue and Violet
are available. |
|
Display MAM |
Enter Yes/No |
MAM
is the acronym for a Music Animation Machine.
A display involving Red rectangles for right hand notes and Blue for
left. In this mode a player may strike
any key(s) on the right hand for the Red blocks and any Left for the
Blue. This is especially attractive
to beginners. MAM
may be displayed with XMATCH or alone. |
User Preferences Descriptions (3)
|
Name
of Preference |
User
Response |
Description
of Preference |
|
Display XMATCH |
Enter Yes/No |
XMATCH is the
matching of a note/pitch to an qwerty key based on a
the patented Aqwertian Dynamic Pitch Algorithms that produce qwerty keyboard
fingering instructions that are playable. |
|
Recording |
Enter a Name for
this Recording Do not add a file suffix such as .mus or .aqw. |
When the RECORD Button is clicked to start recorded play….the program
checks to see that a name has been entered so that the results can be
retrieved subsequently for listening.
Recordings are in the form of |
|
Amplification |
Enter a number
from 100 to 200 |
This is the
volume control and works with your computers volume control. Personal preference. A number entered over 200 has no additional
effect. |
|
Tempo Factor |
Enter a number
from 1 to 10 |
The Tempo Factor specifies a multiplier for the tempo. 1 means to play at
the tempo specified in the MUS file. 2 means to play at a tempo twice
as fast. 0.5 means half as fast.
A player may move forward at any speed unrestricted by the Tempo
Factor setting,
however to use the NOW Line to pace the play the correct Tempo
should be used. |
User Preferences
Descriptions (4)
|
Name
of Preference |
User
Response |
Description
of Preference |
|
Start
Measure |
Enter a Number
less than the total number of measures. |
This preference works
in conjunction with Display Measures (see above) in
allowing quick cycling through specific measure(s) that need more
practice. Play starts at the designated measure and can be
ended at any measure
subsequent just by clicking Stop on the Menu Bar or clicking the Close X at
top right on the screen. The
player is returned to the Arrangement screen.
Clicking on
Play will start the practice again. |
|
Measures
Displayed |
Enter a Number Greater than 1 |
This is the
number of measures displayed per line and works in conjunction with the
number of
Lines Displayed the Font Height, and the Screen Resolution setting on the players PC
to provide a display size that suits the player best. |
|
Lines
Displayed |
Enter a Number
Greater than 0 |
This is the
number of music lines displayed. Each
line consists of the number of measures specified above. |
|
Font
Height |
Enter a Number
Greater than 10 |
Font Height
refers to the
size of the Alphanumeric Qwerty Keyboard key names, ie A,B,C, 1, 2. Increase this number until you can read the
notes easily. |
|
Karaoke
(Future) |
N/A |
Karaoke Lyrics
are now supported. Ignore this field. |
Button
Operations

|
DESCRIPTION OF FUNCTION
SUPPORTED |
|
OPENS AN EXISTING ARRANGEMENT FOR PLAY, LISTEN, OR EDIT |
|
USED
TO CREATE A NEW
ARRANGEMENT – LOADS DEFAULT PREFERENCE SETTINGS |
|
TRANSFERS
PLAYER TO THE PERFORMANCE SCREEN AND LOADS SELECTED MUSIC PIECE - READY TO PLAY |
|
STARTS AND PLAYS THE SELECTED MUSIC PIECE FOR LISTENING. |
|
OPENS
A FAVORITE PIECE OF MUSIC FOR EDITING |
|
RETURNS
USER TO
SELECTION SCREEN FROM ARRANGEMENT SCREEN |
|
SAVES
THE CURRENT ARRANGEMENT
TO “ALL” AND IF THE ADD TO OR UPDATE FAVORITES BOX IS
SET TO YES THIS ADDS TO FAVORITES ALSO. |
|
RECORDS
A PERFORMANCE FOR LISTENING
- A NAME IS REQUIRED IN
THE RECORDING NAME BOX (TOP OF
SCREEN) BEFORE BEGINNING. |
The Performance Screen
MUSIC AT YOUR FINGERTIPS! Performance Screen
ILLUSTRATED ABOVE:
·
MEASURE NUMBER Look and location – Used
for locating the Start Measure for Practice Loops
·
MUSIC LINES – Two are shown here.The number of Measures and the Number of Lines chosen
changes the ease of Readability.
·
NOW Line – The Cursor that
reflects the current location in the piece and the next note(s) to be played.
The Music Flows from the top left of the Screen to
the right along each Line…dropping down and to the Left on the next line…and at
the end it returns again to a now
refreshed Measure in the top left of the Screen. See the Measure Numbering above.
·
The
Length of the Blue and Rose Rectangles indicates the duration the Note is to be
Played.
·
The
Qwerty (Computer) Key to be Played is given as a
Letter or Number at the front of the Rectangle.
·
The
Font Height
Preference changes the size of the Letters and Numbers to suite the player’s
visual needs.
·
On
the Menu Bar at the top of this Screen…Stop and the Close X (upper right) Key on your
keyboard will return you to the Arrangement Screen.
Enlarging the
Performance Screen
Illustration
#26:
Enlarging
the Performance Screen (2)
ILLUSTRATED ABOVE:
1.
Open the ‘Display’ Icon
2. Click on the ‘Settings’
Tab
3. Change the ‘Screen
resolution’ to less
Click OK
This
change can easily be reversed when you
are finished playing.
After clicking on OK you
can minimize this
screen or you can close
it and come back
to it later and reset the arrow to your normal display.